9.1 Git 和其他系統-Git 作為用戶端
世界並不完美。通常情況下, 你不能立即將遇到的每個專案切換到 Git。有時你會被另一個 VCS 卡在一個專案上, 希望它是 Git。當您正在處理的專案託管在不同的系統中時, 我們將在本章的第一部分學習如何將 Git 用作用戶端。
在某些時候, 您可能希望將現有專案轉換為 Git。本章的第二部分介紹如何將專案從多個特定系統移轉到 Git 中, 以及在不存在預構建的導入工具時將有效的方法。
Git as a Client
Git 為開發人員提供了如此不錯的體驗, 以至於許多人已經想好了如何在他們的工作站上使用它, 即使他們的團隊的其他成員使用的是完全不同的 VCS。有許多這樣的配接器, 稱為 "橋", 可用。在這裡, 我們將涵蓋那些你最有可能在野外遇到的。
Git 和 Subversion
很大一部分的開源開發專案和相當多的公司專案使用 Subversion 來管理其原始程式碼。它已經存在了十幾年, 在這段時間的大部分時間裡, 它是開源專案事實上的 vcs 選擇。這在很多方面也與 CVS 非常相似, CVS 是此前原始程式碼管理世界的大男孩。
Git 的一大特點是雙向橋接到稱為
git svnsubversion。此工具允許您將 Git 用作 Subversion 伺服器的有效用戶端, 因此您可以使用 Git 的所有本地功能, 然後像在本地使用 Subversion 一樣推送到 Subversion 伺服器。這意味著您可以執行本地分支和合併、使用臨時區域、使用重新建立基礎和挑選櫻桃等操作, 而您的合作者則繼續以黑暗和古老的方式工作。這是一個很好的方法, 可以將 Git 潛入企業環境中, 説明您的其他開發人員提高效率, 同時進行遊說, 以更改基礎架構以完全支援 Git。顛覆橋是 DVCS 世界的門戶藥物。
git svn
所有 Subversion 橋接命令的 Git 中的基本命令都是
git svn。它需要相當多的命令, 因此我們將在經歷幾個簡單的工作流時顯示最常見的命令。
需要注意的是, 當您使用
git svn, 您正在與 subversion 交互, subversion 是一個與 git 非常不同的系統。雖然您可以進行本地分支和合併, 但通常最好通過重新置放工作基礎來保持歷史記錄盡可能的線性, 並避免執行與 git 遠端存放庫同時交互之類的操作。
不要重寫您的歷史記錄, 並嘗試再次推動, 也不要推送到並行 Git 存儲庫, 以便同時與其他 Git 開發人員協作。顛覆只能有一個線性歷史, 混亂是很容易的。如果您與團隊合作, 有些人使用的是 SVN, 而其他人正在使用 Git, 請確保每個人都在使用 SVN 伺服器進行協作, 這樣做將使您的生活更輕鬆。
建立
若要演示此功能, 您需要一個具有寫存取權限的典型 SVN 存儲庫。如果要複製這些示例, 則必須製作我的測試存儲庫的可寫副本。為了輕鬆做到這一點, 您可以使用 Subversion
svnsync的工具。對於這些測試, 我們在 Google Code 上創建了一個新的 Subversion 存儲庫, 該存儲庫是protobuf體專案的部分複本, 該專案是對結構化資料傳輸進行編碼的工具。
若要執行, 首先需要創建一個新的本地 Subversion 存儲庫:
$ mkdir /tmp/test-svn
$ svnadmin create /tmp/test-svn
然後, 允許所有使用者更改轉換-簡單的方法是添加始終退出0的
pre-revprop-change腳本:$ cat /tmp/test-svn/hooks/pre-revprop-change
#!/bin/sh
exit 0;
$ chmod +x /tmp/test-svn/hooks/pre-revprop-change
現在, 您可以通過使用到和從存儲庫調用
svnsync init此專案同步到本地電腦。$ svnsync init file:///tmp/test-svn \
http://progit-example.googlecode.com/svn/
這將設置運行同步的屬性。然後, 您可以通過運行
$ svnsync sync file:///tmp/test-svn
Committed revision 1.
Copied properties for revision 1.
Transmitting file data .............................[...]
Committed revision 2.
Copied properties for revision 2.
[…]
儘管此操作可能只需要幾分鐘時間, 但如果您嘗試將原始存儲庫複製到另一個遠端存放庫而不是本機存放區庫, 則該過程將花費近一個小時, 即使提交不到100個。Subversion 必須一次克隆一個版本, 然後將其推回另一個存儲庫--它的效率低得離譜, 但這是唯一簡單的方法。
開始
現在, 您已經擁有了具有寫存取權限的 Subversion 存儲庫, 您可以遍歷典型的工作流。您將從
git svn clone命令開始, 該命令將整個 subversion 存儲庫導入到本地 git 存儲庫中。請記住, 如果要從真正託管的 Subversion 存儲庫導入, 則應將file:///tmp/test-svn為 subversion 存儲庫的 url:$ git svn clone file:///tmp/test-svn -T trunk -b branches -t tags
Initialized empty Git repository in /private/tmp/progit/test-svn/.git/
r1 = dcbfb5891860124cc2e8cc616cded42624897125 (refs/remotes/origin/trunk)
A m4/acx_pthread.m4
A m4/stl_hash.m4
A java/src/test/java/com/google/protobuf/UnknownFieldSetTest.java
A java/src/test/java/com/google/protobuf/WireFormatTest.java
…
r75 = 556a3e1e7ad1fde0a32823fc7e4d046bcfd86dae (refs/remotes/origin/trunk)
Found possible branch point: file:///tmp/test-svn/trunk => file:///tmp/test-svn/branches/my-calc-branch, 75
Found branch parent: (refs/remotes/origin/my-calc-branch) 556a3e1e7ad1fde0a32823fc7e4d046bcfd86dae
Following parent with do_switch
Successfully followed parent
r76 = 0fb585761df569eaecd8146c71e58d70147460a2 (refs/remotes/origin/my-calc-branch)
Checked out HEAD:
file:///tmp/test-svn/trunk r75
這將在您提供的 URL
git svn init運行相當於兩個命令的命令git svn fetch。這可能需要一段時間。測試專案只有大約75個提交, 代碼庫也沒有那麼大, 但 Git 必須檢查出每個版本, 一次一個, 並單獨提交。對於具有數百或數千個提交的專案, 這實際上可能需要數小時甚至數天才能完成。
The
-T trunk -b branches -t tags part tells Git that this Subversion repository follows the basic branching and tagging conventions. If you name your trunk, branches, or tags differently, you can change these options. Because this is so common, you can replace this entire part with -s, which means standard layout and implies all those options. The following command is equivalent:$ git svn clone file:///tmp/test-svn -s
At this point, you should have a valid Git repository that has imported your branches and tags:
$ git branch -a
* master
  remotes/origin/my-calc-branch
  remotes/origin/tags/2.0.2
  remotes/origin/tags/release-2.0.1
  remotes/origin/tags/release-2.0.2
  remotes/origin/tags/release-2.0.2rc1
  remotes/origin/trunk
Note how this tool manages Subversion tags as remote refs. Let’s take a closer look with the Git plumbing command
show-ref:$ git show-ref
556a3e1e7ad1fde0a32823fc7e4d046bcfd86dae refs/heads/master
0fb585761df569eaecd8146c71e58d70147460a2 refs/remotes/origin/my-calc-branch
bfd2d79303166789fc73af4046651a4b35c12f0b refs/remotes/origin/tags/2.0.2
285c2b2e36e467dd4d91c8e3c0c0e1750b3fe8ca refs/remotes/origin/tags/release-2.0.1
cbda99cb45d9abcb9793db1d4f70ae562a969f1e refs/remotes/origin/tags/release-2.0.2
a9f074aa89e826d6f9d30808ce5ae3ffe711feda refs/remotes/origin/tags/release-2.0.2rc1
556a3e1e7ad1fde0a32823fc7e4d046bcfd86dae refs/remotes/origin/trunk
Git doesn’t do this when it clones from a Git server; here’s what a repository with tags looks like after a fresh clone:
$ git show-ref
c3dcbe8488c6240392e8a5d7553bbffcb0f94ef0 refs/remotes/origin/master
32ef1d1c7cc8c603ab78416262cc421b80a8c2df refs/remotes/origin/branch-1
75f703a3580a9b81ead89fe1138e6da858c5ba18 refs/remotes/origin/branch-2
23f8588dde934e8f33c263c6d8359b2ae095f863 refs/tags/v0.1.0
7064938bd5e7ef47bfd79a685a62c1e2649e2ce7 refs/tags/v0.2.0
6dcb09b5b57875f334f61aebed695e2e4193db5e refs/tags/v1.0.0
Git fetches the tags directly into
refs/tags, rather than treating them remote branches.承諾返回到 Subversion
現在您已經有了一個工作的存儲庫, 您可以在專案上做一些工作, 並將提交推回到上游, 有效地將 Git 用作 SVN 用戶端。如果編輯其中一個檔並提交該檔, 則會有一個在本地 Git 中存在的提交, 該提交在 Subversion 伺服器上不存在:
$ git commit -am 'Adding git-svn instructions to the README'
[master 4af61fd] Adding git-svn instructions to the README
 1 file changed, 5 insertions(+)
接下來, 您需要將更改推向上游。請注意, 這將如何改變您使用 Subversion 的方式, 您可以離線執行多個提交, 然後一次將它們全部推送到 Subversion 伺服器。要推送到 Subversion 伺服器, 請運行
git svn dcommit命令:$ git svn dcommit
Committing to file:///tmp/test-svn/trunk ...
M README.txt
Committed r77
M README.txt
r77 = 95e0222ba6399739834380eb10afcd73e0670bc5 (refs/remotes/origin/trunk)
No changes between 4af61fd05045e07598c553167e0f31c84fd6ffe1 and refs/remotes/origin/trunk
Resetting to the latest refs/remotes/origin/trunk
這將獲取您在 Subversion 伺服器代碼之上所做的所有提交, 對每個提交執行 Subversion 提交, 然後重寫本地 Git 提交以包含唯一識別碼。這一點很重要, 因為這意味著提交的所有 SHA-1 校驗和都發生了變化。部分由於這個原因, 與 Subversion 伺服器同時使用基於 g這一基礎的專案遠端版本並不是一個好主意。如果您查看最後一次提交, 您可以看到添加的新
git-svn-id$ git log -1
commit 95e0222ba6399739834380eb10afcd73e0670bc5
Author: ben <ben@0b684db3-b064-4277-89d1-21af03df0a68>
Date: Thu Jul 24 03:08:36 2014 +0000
Adding git-svn instructions to the README
git-svn-id: file:///tmp/test-svn/trunk@77 0b684db3-b064-4277-89d1-21af03df0a68
請注意, 最初在您提交時以
4af61fd的 SHA-1 校驗和現在從95e0222。如果要同時推送到 Git 伺服器和 Subversion 伺服器, 則必須首先推送 (dcommit) 到 subversion 伺服器, 因為該操作會更改提交資料。在新的變化中拉扯
如果您正在與其他開發人員合作, 那麼在某個時候, 您中的一個將推送, 然後另一個將嘗試推送衝突的更改。在合併他們的工作之前, 該更改將被拒絕。在
git svn中, 它看起來像這樣:$ git svn dcommit
Committing to file:///tmp/test-svn/trunk ...
ERROR from SVN:
Transaction is out of date: File '/trunk/README.txt' is out of date
W: d5837c4b461b7c0e018b49d12398769d2bfc240a and refs/remotes/origin/trunk differ, using rebase:
:100644 100644 f414c433af0fd6734428cf9d2a9fd8ba00ada145 c80b6127dd04f5fcda218730ddf3a2da4eb39138 M README.txt
Current branch master is up to date.
ERROR: Not all changes have been committed into SVN, however the committed
ones (if any) seem to be successfully integrated into the working tree.
Please see the above messages for details.
若要解決此問題, 您可以運行
git svn rebase它會在伺服器上提取尚未完成的任何更改, 並將您所擁有的任何工作重新建立在伺服器上的基礎上:$ git svn rebase
Committing to file:///tmp/test-svn/trunk ...
ERROR from SVN:
Transaction is out of date: File '/trunk/README.txt' is out of date
W: eaa029d99f87c5c822c5c29039d19111ff32ef46 and refs/remotes/origin/trunk differ, using rebase:
:100644 100644 65536c6e30d263495c17d781962cfff12422693a b34372b25ccf4945fe5658fa381b075045e7702a M README.txt
First, rewinding head to replay your work on top of it...
Applying: update foo
Using index info to reconstruct a base tree...
M README.txt
Falling back to patching base and 3-way merge...
Auto-merging README.txt
ERROR: Not all changes have been committed into SVN, however the committed
ones (if any) seem to be successfully integrated into the working tree.
Please see the above messages for details.
現在, 您的所有工作都在 Subversion 伺服器上的工作之上, 因此您可以成功
dcommit:$ git svn dcommit
Committing to file:///tmp/test-svn/trunk ...
M README.txt
Committed r85
M README.txt
r85 = 9c29704cc0bbbed7bd58160cfb66cb9191835cd8 (refs/remotes/origin/trunk)
No changes between 5762f56732a958d6cfda681b661d2a239cc53ef5 and refs/remotes/origin/trunk
Resetting to the latest refs/remotes/origin/trunk
請注意, 與 Git 不同的是, git 要求您合併您尚未在本地擁有的上游工作, 然後才能推送,
git svn在更改衝突 (與 subversion 的工作方式很相似) 時才會這樣做。如果其他人將更改推送到一個檔, 然後將更改推送到另一個檔, 則dcommit德將正常工作:$ git svn dcommit
Committing to file:///tmp/test-svn/trunk ...
M configure.ac
Committed r87
M autogen.sh
r86 = d8450bab8a77228a644b7dc0e95977ffc61adff7 (refs/remotes/origin/trunk)
M configure.ac
r87 = f3653ea40cb4e26b6281cec102e35dcba1fe17c4 (refs/remotes/origin/trunk)
W: a0253d06732169107aa020390d9fefd2b1d92806 and refs/remotes/origin/trunk differ, using rebase:
:100755 100755 efa5a59965fbbb5b2b0a12890f1b351bb5493c18 e757b59a9439312d80d5d43bb65d4a7d0389ed6d M autogen.sh
First, rewinding head to replay your work on top of it...
記住這一點很重要, 因為結果是一個專案狀態, 在您推送時, 這兩台電腦上都不存在。如果更改不相容, 但不衝突, 則可能會遇到難以診斷的問題。這與使用 Git 伺服器不同--在 Git 中, 您可以在發佈用戶端系統之前對其狀態進行全面測試, 而在 SVN 中, 您永遠無法確定提交之前和提交之後的狀態是否相同。
您還應該運行此命令, 從 Subversion 伺服器中提取更改, 即使您還沒有準備好提交自己。您可以運行
git svn fetch來獲取新資料, 但git svn rebase提取, 然後更新本地提交。$ git svn rebase
M autogen.sh
r88 = c9c5f83c64bd755368784b444bc7a0216cc1e17b (refs/remotes/origin/trunk)
First, rewinding head to replay your work on top of it...
Fast-forwarded master to refs/remotes/origin/trunk.
每隔一段時間運行
git svn rebase確保您的代碼始終是最新的。不過, 在運行此目錄時, 您需要確保您的工作目錄是乾淨的。如果您進行了本地更改, 則必須先存儲您的工作或臨時提交它, 然後再運行git svn rebase否則, 如果它看到重新基將導致合併衝突, 該命令將停止。Git 分支問題
當您對 Git 工作流感到滿意時, 您可能會創建主題分支, 對其進行處理, 然後將其合併。如果您通過
git svn送到 subversion 伺服器, 則可能希望每次都將工作重新置放到單個分支上, 而不是將分支合併在一起。更喜歡重新建立基礎的原因是 subversion 具有線性歷史記錄, 並且不像 Git 那樣處理合併, 因此git svn在將快照轉換為 subversion 提交時只遵循第一個父級。
假設您的歷史記錄如下所示: 您創建了一個
experiment分支, 進行了兩次提交, 然後將它們合併回master。當您dcommit時, 您會看到如下輸出:$ git svn dcommit
Committing to file:///tmp/test-svn/trunk ...
M CHANGES.txt
Committed r89
M CHANGES.txt
r89 = 89d492c884ea7c834353563d5d913c6adf933981 (refs/remotes/origin/trunk)
M COPYING.txt
M INSTALL.txt
Committed r90
M INSTALL.txt
M COPYING.txt
r90 = cb522197870e61467473391799148f6721bcf9a0 (refs/remotes/origin/trunk)
No changes between 71af502c214ba13123992338569f4669877f55fd and refs/remotes/origin/trunk
Resetting to the latest refs/remotes/origin/trunk
在合併歷史記錄的分支上運行
dcommit效果很好, 只是當您查看 git 專案歷史記錄時, 它沒有重寫您在experiment分支上所做的任何提交-相反, 所有這些更改都顯示在 svn 版本中單個合併提交。
當其他人克隆工作時, 他們看到的只是合併提交, 所有的工作都壓扁了, 就好像你跑了
git merge --squash他們看不到提交資料, 這些資料來自何處或提交的時間。顛覆分支
Subversion 中的分支與 Git 中的分支不同;如果你能避免使用它太多, 那可能是最好的。但是, 您可以使用 git svn 創建並提交到 Subversion 中的分支。
創建新的 SVN 分支
若要在 Subversion 中創建新分支, 請運行
git svn branch [branchname]:$ git svn branch opera
Copying file:///tmp/test-svn/trunk at r90 to file:///tmp/test-svn/branches/opera...
Found possible branch point: file:///tmp/test-svn/trunk => file:///tmp/test-svn/branches/opera, 90
Found branch parent: (refs/remotes/origin/opera) cb522197870e61467473391799148f6721bcf9a0
Following parent with do_switch
Successfully followed parent
r91 = f1b64a3855d3c8dd84ee0ef10fa89d27f1584302 (refs/remotes/origin/opera)
這相當於
svn copy trunk branches/opera, 並在 subversion 伺服器上運行。重要的是要注意, 它不會檢查你到該分支;如果你在這一點上提交, 該提交將去樹幹上的trunk, 而不是opera.切換活動分支
Git 通過查找您歷史上任何 Subversion 分支的尖端來計算您的 Dcommits 要轉到哪個分支--您應該只有一個分支, 它應該是您當前分支歷史上最後一個
git-svn-id分支。
如果要同時處理多個分支, 可以設置本地分支, 以便在該分支的導入 Subversion 提交時啟動它們,
dcommit到特定的 subversion 分支。如果你想要一個opera分支, 你可以單獨工作, 你可以運行$ git branch opera remotes/origin/opera
現在, 如果你想把你的
opera分支合併成trunk(你的master分支), 你可以用一個正常的git merge來做到這一點。但您需要提供描述性提交消息 (通過-m), 否則合併將顯示 "合併分支歌劇", 而不是有用的內容。
請記住, 儘管您使用
git merge來執行此操作, 並且合併可能會比 subversion 中容易得多 (因為 git 將自動檢測到適合您的合併基礎), 但這不是正常的 git 合併提交。您必須將此資料推回無法處理跟蹤多個父級的提交的 Subversion 伺服器; 否則, 將無法處理多個父資料。所以, 在你把它推上之後, 它看起來就像一個提交, 在一個提交下壓縮了另一個分支的所有工作。將一個分支合併到另一個分支後, 您無法輕鬆地返回並繼續處理該分支, 就像您通常在 Git 中所做的那樣。您運行的dcommit單命令會擦除任何表示合併了哪個分支的資訊, 因此後續的合併基計算將是錯誤的--dcommit 使git merge結果看起來像您運行git merge --squash不幸的是, 沒有好的方法來避免這種情況-Subversion 不能存儲此資訊, 所以你總是會癱瘓, 它的局限性, 而你使用它作為您的伺服器。為了避免出現問題, 應在將本地分支 (在本例中為opera) 合併到主幹後將其刪除。顛覆命令
git svn工具集提供了許多命令, 通過提供一些與 subversion 中類似的功能, 説明簡化向 git 的轉換。下面是一些命令, 為您提供了用於 "Subversion" 的內容。SVN 樣式歷史記錄
如果您習慣了 Subversion, 並且希望以 SVN 輸出樣式查看您的歷史記錄, 則可以運行
git svn log, 以 SVN 格式查看提交歷史記錄:$ git svn log
------------------------------------------------------------------------
r87 | schacon | 2014-05-02 16:07:37 -0700 (Sat, 02 May 2014) | 2 lines
autogen change
------------------------------------------------------------------------
r86 | schacon | 2014-05-02 16:00:21 -0700 (Sat, 02 May 2014) | 2 lines
Merge branch 'experiment'
------------------------------------------------------------------------
r85 | schacon | 2014-05-02 16:00:09 -0700 (Sat, 02 May 2014) | 2 lines
updated the changelog
你應該知道
git svn log的兩個重要的事情。首先, 它可以離線工作, 這與實際svn log命令不同, 該命令要求 subversion 伺服器提供資料。其次, 它只顯示已提交到 Subversion 伺服器的提交。本地 Git 提交的是, 您尚未承諾的未出現;同時, 人們對 Subversion 伺服器進行的提交也是如此。它更像是 Subversion 伺服器上提交的最後一個已知狀態。SVN 注釋
就像
git svn log命令類比svn log命令離線一樣, 您可以通過運行git svn blame [FILE]來獲得相當於svn annotate注釋的內容。輸出如下所示:$ git svn blame README.txt
2 temporal Protocol Buffers - Google's data interchange format
2 temporal Copyright 2008 Google Inc.
2 temporal http://code.google.com/apis/protocolbuffers/
2 temporal
22 temporal C++ Installation - Unix
22 temporal =======================
2 temporal
79 schacon Committing in git-svn.
78 schacon
2 temporal To build and install the C++ Protocol Buffer runtime and the Protocol
2 temporal Buffer compiler (protoc) execute the following:
2 temporal
同樣, 它不會顯示您在 Git 中本地執行的提交, 也不會顯示在此期間已被推送到 Subversion 的提交。
SVN 伺服器資訊
您還可以通過運行
git svn info獲得與svn info資訊相同的資訊:$ git svn info
Path: .
URL: https://schacon-test.googlecode.com/svn/trunk
Repository Root: https://schacon-test.googlecode.com/svn
Repository UUID: 4c93b258-373f-11de-be05-5f7a86268029
Revision: 87
Node Kind: directory
Schedule: normal
Last Changed Author: schacon
Last Changed Rev: 87
Last Changed Date: 2009-05-02 16:07:37 -0700 (Sat, 02 May 2009)
這就像
blame和log, 它運行離線, 並且僅在您上次與 subversion 伺服器通信時是最新的。忽略顛覆性忽略的內容
如果克隆具有
svn:ignore在任何地方設置的屬性的 subversion 存儲庫, 則可能需要設置相應的.gitignore檔, 這樣就不會意外提交不應該提交的檔。git svn有兩個命令來説明解決此問題。第一個是git svn create-ignore忽略, 它會自動為您創建相應的.gitignore檔, 以便您的下一次提交可以包括這些檔。
第二個命令是
git svn show-ignore忽略, 它列印出來您需要放入.gitignore檔中的行, 以便您可以將輸出重定向到專案排除檔中:$ git svn show-ignore > .git/info/exclude
這樣, 你就不會把這個專案和
.gitignore檔亂扔了。如果您是 Subversion 團隊中唯一的 Git 使用者, 並且您的隊友不希望專案中的. .gitignore檔, 則這是一個不錯的選擇。Git-Svn 摘要
git svn是有用的, 如果你被困在一個 subversion 伺服器, 或在其他需要運行 subversion 伺服器的開發環境中。但是, 您應該認為它已癱瘓 Git, 否則您將遇到翻譯中可能會混淆您和您的合作者的問題。要遠離麻煩, 請嘗試遵循以下準則:- 保持不包含
git merge合併所做的合併提交的線性 git 歷史記錄。將您在主線分支之外所做的任何工作重新建立在其基礎上;不要將其合併。 - 不要在單獨的 Git 伺服器上設置和協作。可能有一個可以加快新開發人員的克隆速度, 但不要將任何沒有
git-svn-id條目的東西推給它。您甚至可能希望添加一個pre-receive鉤子, 該鉤子檢查每個提交消息git-svn-id並拒絕包含不包含提交的推送。
如果遵循這些準則, 使用 Subversion 伺服器可能會更耐受。但是, 如果可以移動到真正的 Git 伺服器, 這樣做可以為您的團隊帶來更多好處。
Git 和 Mercurial
DVCS 的宇宙比 Git 還大。事實上, 在這個空間裡還有很多其他的系統, 每個系統都有自己的角度來正確地進行分散式版本控制。除了 Git, 最受歡迎的是 Mercurial, 兩者在許多方面非常相似。
好消息是, 如果您更喜歡 Git 的用戶端行為, 但正在處理一個原始程式碼由 Mercurial 控制的專案, 那麼有一種方法可以將 Git 用作 mer用量託管存儲庫的用戶端。由於 Git 與伺服器存儲庫的對話方式是通過遠端來實現的, 因此將此橋作為遠端説明器實現應該不會讓人感到意外。這個專案的名字叫 git-remote-hg, 可以在HTTPs://github.com/felipec/git-remote-hg.
吉特-雷莫特-赫格
首先, 您需要安裝 git-remote-hg。這基本上需要將其檔拖放到路徑中的某個位置, 如下所示:
$ curl -o ~/bin/git-remote-hg \
  https://raw.githubusercontent.com/felipec/git-remote-hg/master/git-remote-hg
$ chmod +x ~/bin/git-remote-hg
...假設
~/bin在您$PATH。Git-remote-hg 還有另外一個依賴關係: Pythonmercurial。如果您安裝了 Python, 這就像:$ pip install mercurial
(如果您沒有安裝 Python, 請訪問HTTPs://www.python.org/並首先獲取它。
你最不需要的是汞客戶。如果還沒有, 請轉到HTTP://mercurial.selenic.com/並安裝它。
現在你已經準備好搖滾了。您所需要的只是一個可以推送到的 Mercurial 存儲庫。幸運的是, 每個 Mercurial 存儲庫都可以這樣做, 因此我們將使用每個人都用來學習 Mercurial 的 "hello world" 存儲庫:
$ hg clone http://selenic.com/repo/hello /tmp/hello開始
現在我們有了一個合適的 "伺服器端" 存儲庫, 我們可以通過一個典型的工作流。正如你所看到的, 這兩個系統非常相似, 沒有太多摩擦。
與 Git 一樣, 首先我們克隆:
$ git clone hg::/tmp/hello /tmp/hello-git
$ cd /tmp/hello-git
$ git log --oneline --graph --decorate
* ac7955c (HEAD, origin/master, origin/branches/default, origin/HEAD, refs/hg/origin/branches/default, refs/hg/origin/bookmarks/master, master) Create a makefile
* 65bb417 Create a standard "hello, world" program
您會注意到, 使用 Mercurial 存儲庫使用標準
git clone命令。這是因為 git-remote-hg 的工作水準相當低, 使用的機制類似于 Git 的 HTTPs協定是如何實現的 (遠端協助程式)。由於 Git 和 Mercurial 都是為每個用戶端設計的, 以擁有存儲庫歷史記錄的完整副本, 因此此命令將生成一個完整的克隆, 包括專案的所有歷史記錄, 並且執行得相當快。
日誌命令顯示了兩個提交, 最近一次是由大量的裁判指出的。原來, 其中一些其實並不存在。讓我們來看看
.git目錄中的實際情況:$ tree .git/refs
.git/refs
├── heads
│ └── master
├── hg
│ └── origin
│ ├── bookmarks
│ │ └── master
│ └── branches
│ └── default
├── notes
│ └── hg
├── remotes
│ └── origin
│ └── HEAD
└── tags
9 directories, 5 files
Git-remote-hg 試圖使事情變得更加有特權, 但在引擎蓋下, 它正在管理兩個略有不同的系統之間的概念映射。
refs/hg目錄是存儲實際遠端 refs 的位置。例如, refs/hg/origin/branches/default值是一個 git ref 檔, 其中包含以 "ac7955c" 開頭的 SHA-1, 這是master指向的提交。因此, refs/hg目錄有點像一個假refs/remotes/origin源, 但它又增加了書簽和分支之間的區別。notes/hg檔是 git-remote-hg 如何將 git 提交雜湊到 mercurial 變更 et id 的起點。讓我們來探討一下:$ cat notes/hg
d4c10386...
$ git cat-file -p d4c10386...
tree 1781c96...
author remote-hg <> 1408066400 -0800
committer remote-hg <> 1408066400 -0800
Notes for master
$ git ls-tree 1781c96...
100644 blob ac9117f... 65bb417...
100644 blob 485e178... ac7955c...
$ git cat-file -p ac9117f
0a04b987be5ae354b710cefeba0e2d9de7ad41a9
因此
refs/notes/hg指向樹, 在 git 物件資料庫中, 樹是具有名稱的其他物件的清單。git ls-tree樹中專案的模式、類型、物件雜湊和檔案名。一旦我們深入到其中一個樹專案, 我們發現它裡面是一個名為 "ac9117f" (主控的提交的 SHA-1 雜湊), 內容 "0a04b98" (這是default分支的尖端的 mercurial 變更 ET 的 id). master
好消息是, 我們大多不用擔心這一切。典型的工作流與使用 Git 遙控器沒有太大區別。
在我們繼續之前, 我們還應該注意一件事: 忽視。Mercurial 和 Git 對此使用了非常相似的機制, 但您可能不想實際將
.gitignore檔提交到 mercurial 存儲庫中。幸運的是, Git 有一種方法可以忽略磁片存儲庫的本地檔, 並且 Mercurial 格式與 Git 相容, 因此您只需將其複製:$ cp .hgignore .git/info/exclude.git/info/exclude行為, 就像.gitignore一樣, 但不包括在提交中。流程
假設我們已經完成了一些工作, 並在
master分支上進行了一些提交, 並且您已準備好將其推送到遠端存放庫。下面是我們的存儲庫現在的樣子:$ git log --oneline --graph --decorate
* ba04a2a (HEAD, master) Update makefile
* d25d16f Goodbye
* ac7955c (origin/master, origin/branches/default, origin/HEAD, refs/hg/origin/branches/default, refs/hg/origin/bookmarks/master) Create a makefile
* 65bb417 Create a standard "hello, world" program
我們
master分支是兩個提交origin/master, 但這兩個提交只存在於我們的本地電腦上。讓我們看看是否還有人同時做重要的工作:$ git fetch
From hg::/tmp/hello
ac7955c..df85e87 master -> origin/master
ac7955c..df85e87 branches/default -> origin/branches/default
$ git log --oneline --graph --decorate --all
* 7b07969 (refs/notes/hg) Notes for default
* d4c1038 Notes for master
* df85e87 (origin/master, origin/branches/default, origin/HEAD, refs/hg/origin/branches/default, refs/hg/origin/bookmarks/master) Add some documentation
| * ba04a2a (HEAD, master) Update makefile
| * d25d16f Goodbye
|/
* ac7955c Create a makefile
* 65bb417 Create a standard "hello, world" program
由於我們使用
--all標誌, 我們看到了由 git-remote-hg 在內部使用的 "注釋" refs, 但我們可以忽略它們。其餘的都是我們所期望的; 其餘的都是我們所期望的。origin/master已經一個承諾的進步, 我們的歷史現在已經分歧了。與我們在本章中使用的其他系統不同, Mercurial 能夠處理合併, 所以我們不會做任何花哨的事情。$ git merge origin/master
Auto-merging hello.c
Merge made by the 'recursive' strategy.
hello.c | 2 +-
1 file changed, 1 insertion(+), 1 deletion(-)
$ git log --oneline --graph --decorate
* 0c64627 (HEAD, master) Merge remote-tracking branch 'origin/master'
|\
| * df85e87 (origin/master, origin/branches/default, origin/HEAD, refs/hg/origin/branches/default, refs/hg/origin/bookmarks/master) Add some documentation
* | ba04a2a Update makefile
* | d25d16f Goodbye
|/
* ac7955c Create a makefile
* 65bb417 Create a standard "hello, world" program
完美。我們運行測試, 一切都通過, 所以我們準備與團隊的其他成員分享我們的工作:
$ git push
To hg::/tmp/hello
   df85e87..0c64627  master -> master
就是這樣!如果您查看 Mercurial 存儲庫, 您將看到這做了我們所期望的操作:
$ hg log -G --style compact
o    5[tip]:4,2   dc8fa4f932b8   2014-08-14 19:33 -0700   ben
|\     Merge remote-tracking branch 'origin/master'
| |
| o  4   64f27bcefc35   2014-08-14 19:27 -0700   ben
| |    Update makefile
| |
| o  3:1   4256fc29598f   2014-08-14 19:27 -0700   ben
| |    Goodbye
| |
@ |  2   7db0b4848b3c   2014-08-14 19:30 -0700   ben
|/     Add some documentation
|
o  1   82e55d328c8c   2005-08-26 01:21 -0700   mpm
|    Create a makefile
|
o  0   0a04b987be5a   2005-08-26 01:20 -0700   mpm
     Create a standard "hello, world" program
編號為 2的變更集是由 Mercurial 製作的, 編號為 3和4的變更集是由 git-remote-hg 推送 git 提交的變更集。
分支和書簽
Git 只有一種分支: 在進行提交時移動的引用。在 Mercurial 中, 這種引用稱為 "書簽", 其行為方式與 Git 分支大同小異。
梅庫瑞爾的 "分支" 概念更是重量級。使用變更集記錄變更集的分支, 這意味著它將始終存在於存儲庫歷史記錄中。下面是在
develop分支上進行的提交的示例:$ hg log -l 1
changeset: 6:8f65e5e02793
branch: develop
tag: tip
user: Ben Straub <ben@straub.cc>
date: Thu Aug 14 20:06:38 2014 -0700
summary: More documentation
請注意以 "分支" 開頭的行。Git 不能真正複製它 (也不需要; 這兩種類型的分支都可以表示為 Git ref), 但 git-remote-hg 需要瞭解差異, 因為 Mercurial 關心。
創建汞書簽與創建 Git 分支一樣簡單。在 Git 方面:
$ git checkout -b featureA
Switched to a new branch 'featureA'
$ git push origin featureA
To hg::/tmp/hello
 * [new branch]      featureA -> featureA
這就是它的全部。在美的一面, 它看起來像這樣:
$ hg bookmarks
   featureA                  5:bd5ac26f11f9
$ hg log --style compact -G
@  6[tip]   8f65e5e02793   2014-08-14 20:06 -0700   ben
|    More documentation
|
o    5[featureA]:4,2   bd5ac26f11f9   2014-08-14 20:02 -0700   ben
|\     Merge remote-tracking branch 'origin/master'
| |
| o  4   0434aaa6b91f   2014-08-14 20:01 -0700   ben
| |    update makefile
| |
| o  3:1   318914536c86   2014-08-14 20:00 -0700   ben
| |    goodbye
| |
o |  2   f098c7f45c4f   2014-08-14 20:01 -0700   ben
|/     Add some documentation
|
o  1   82e55d328c8c   2005-08-26 01:21 -0700   mpm
|    Create a makefile
|
o  0   0a04b987be5a   2005-08-26 01:20 -0700   mpm
     Create a standard "hello, world" program
請注意修訂版5上的新
[featureA]標記。這些功能與 Git 端的 Git 分支完全一樣, 但有一個例外: 您不能從 Git 端刪除書簽 (這是遠端協助程式的限制)。
您還可以在 "重量級" 的 Mercurial 分支上工作: 只需在
branches命名空間中放置一個分支:$ git checkout -b branches/permanent
Switched to a new branch 'branches/permanent'
$ vi Makefile
$ git commit -am 'A permanent change'
$ git push origin branches/permanent
To hg::/tmp/hello
* [new branch] branches/permanent -> branches/permanent
下面是在美的一面, 它看起來像:
$ hg branches
permanent                      7:a4529d07aad4
develop                        6:8f65e5e02793
default                        5:bd5ac26f11f9 (inactive)
$ hg log -G
o  changeset:   7:a4529d07aad4
|  branch:      permanent
|  tag:         tip
|  parent:      5:bd5ac26f11f9
|  user:        Ben Straub <ben@straub.cc>
|  date:        Thu Aug 14 20:21:09 2014 -0700
|  summary:     A permanent change
|
| @  changeset:   6:8f65e5e02793
|/   branch:      develop
|    user:        Ben Straub <ben@straub.cc>
|    date:        Thu Aug 14 20:06:38 2014 -0700
|    summary:     More documentation
|
o    changeset:   5:bd5ac26f11f9
|\   bookmark:    featureA
| |  parent:      4:0434aaa6b91f
| |  parent:      2:f098c7f45c4f
| |  user:        Ben Straub <ben@straub.cc>
| |  date:        Thu Aug 14 20:02:21 2014 -0700
| |  summary:     Merge remote-tracking branch 'origin/master'
[...]
分支名稱 "永久" 被記錄, 變更集標記為 7.
從 Git 方面來看, 使用這兩種分支樣式中的任何一種都是一樣的: 只需像往常一樣簽出、提交、提取、合併、拉和推。有一點你應該知道, Mercurial 不支援重寫歷史, 只增加了它。以下是我們的 Mercurial 存儲庫在互動式重基和強制推送之後的樣子:
$ hg log --style compact -G
o  10[tip]   99611176cbc9   2014-08-14 20:21 -0700   ben
|    A permanent change
|
o  9   f23e12f939c3   2014-08-14 20:01 -0700   ben
|    Add some documentation
|
o  8:1   c16971d33922   2014-08-14 20:00 -0700   ben
|    goodbye
|
| o  7:5   a4529d07aad4   2014-08-14 20:21 -0700   ben
| |    A permanent change
| |
| | @  6   8f65e5e02793   2014-08-14 20:06 -0700   ben
| |/     More documentation
| |
| o    5[featureA]:4,2   bd5ac26f11f9   2014-08-14 20:02 -0700   ben
| |\     Merge remote-tracking branch 'origin/master'
| | |
| | o  4   0434aaa6b91f   2014-08-14 20:01 -0700   ben
| | |    update makefile
| | |
+---o  3:1   318914536c86   2014-08-14 20:00 -0700   ben
| |      goodbye
| |
| o  2   f098c7f45c4f   2014-08-14 20:01 -0700   ben
|/     Add some documentation
|
o  1   82e55d328c8c   2005-08-26 01:21 -0700   mpm
|    Create a makefile
|
o  0   0a04b987be5a   2005-08-26 01:20 -0700   mpm
     Create a standard "hello, world" program
已創建變更8、 9和10,屬於
permanent分支, 但舊的變更集仍然存在。這可能會讓使用 Mercurial 的隊友感到非常困惑, 所以儘量避免。汞摘要
Git 和 Mercurial 非常相似, 跨越邊界的工作是相當無痛的。如果您避免更改離開電腦的歷史記錄 (通常建議這樣做), 您甚至可能不知道另一端是 Mercurial。
Git 和 Perforce
Perforce is a very popular version-control system in corporate environments. It’s been around since 1995, which makes it the oldest system covered in this chapter. As such, it’s designed with the constraints of its day; it assumes you’re always connected to a single central server, and only one version is kept on the local disk. To be sure, its features and constraints are well-suited to several specific problems, but there are lots of projects using Perforce where Git would actually work better.
There are two options if you’d like to mix your use of Perforce and Git. The first one we’ll cover is the “Git Fusion” bridge from the makers of Perforce, which lets you expose subtrees of your Perforce depot as read-write Git repositories. The second is git-p4, a client-side bridge that lets you use Git as a Perforce client, without requiring any reconfiguration of the Perforce server.
Git Fusion
Perforce provides a product called Git Fusion (available at http://www.perforce.com/git-fusion), which synchronizes a Perforce server with Git repositories on the server side.
SETTING UP
對於我們的示例, 我們將使用 Git Fusion 最簡單的安裝方法, 即下載運行 perforce 守護進程和 Git Fusion 的虛擬機器。您可以從HTTP://www.perforce.com/downloads/Perforce/20-User獲取虛擬機器映射, 下載完成後, 將其導入到您最喜愛的虛擬化軟體中 (我們將使用 ververalbox)。
初次開機電腦時, 它要求您自訂三個 Linux 使用者 (
root、perforce git) 的密碼, 並提供一個實例名稱, 該名稱可用於將此安裝與同一上的其他安裝區分開來。網路。當這一切都完成後, 您將看到: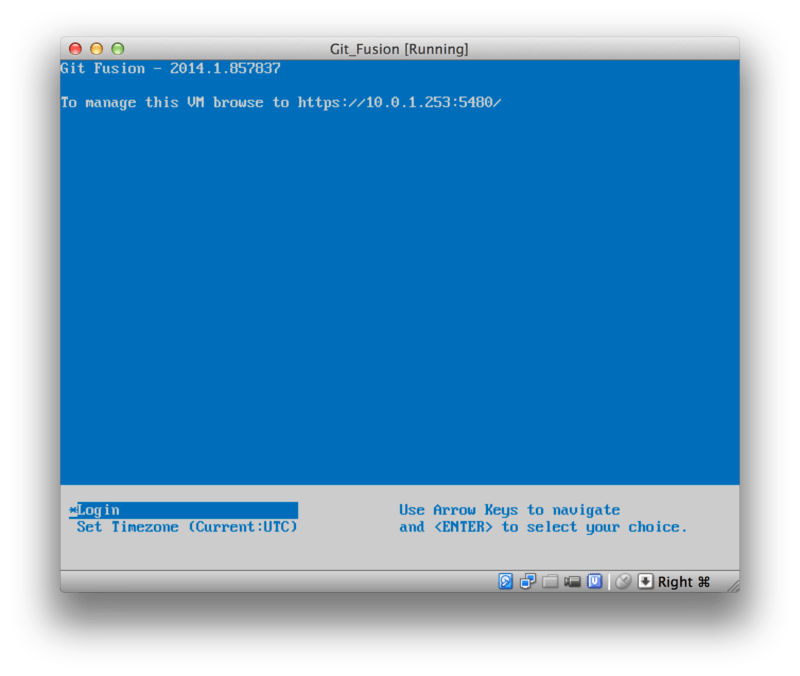
表145。Git 融合虛擬機器啟動畫面。
您應該注意此處顯示的 IP 位址, 稍後我們將使用它。接下來, 我們將創建一個 Perforce 使用者。選擇底部的 "登錄" 選項, 然後按 enter (或 SSH 到電腦), 然後以
root身份登錄。然後使用這些命令創建使用者:$ p4 -p localhost:1666 -u super user -f john
$ p4 -p localhost:1666 -u john passwd
$ exit
第一個將打開一個 VI 編輯器來自訂使用者, 但您可以通過鍵入
:wq和點擊輸入來接受預設值。第二個將提示您輸入密碼兩次。這就是我們需要做的所有關于 shell 提示, 所以退出會話。
接下來, 您需要遵循的是告訴 Git 不要驗證 SSL 憑證。Git 融合映射附帶一個證書, 但它適用于與虛擬機器的 IP 位址不匹配的域, 因此 Git 將拒絕 HTTPS 連接。如果這將是一個永久安裝, 請參考 Perforce Git 融合手冊以安裝不同的證書;對於我們的示例目的, 這就足夠了:
$ export GIT_SSL_NO_VERIFY=true
現在我們可以測試一切都正常了。
$ git clone https://10.0.1.254/Talkhouse
Cloning into 'Talkhouse'...
Username for 'https://10.0.1.254': john
Password for 'https://john@10.0.1.254':
remote: Counting objects: 630, done.
remote: Compressing objects: 100% (581/581), done.
remote: Total 630 (delta 172), reused 0 (delta 0)
Receiving objects: 100% (630/630), 1.22 MiB | 0 bytes/s, done.
Resolving deltas: 100% (172/172), done.
Checking connectivity... done.
虛擬機器映射配備了一個可以克隆的示例專案。在這裡, 我們克隆了 HTTPS, 與 john
john使用者, 我們創建了上面;Git 要求提供此連接的憑據, 但憑據緩存將允許我們跳過此步驟以處理任何後續請求。融合配置
一旦你安裝了 Git 融合, 你會想調整配置。這實際上是相當容易做到使用你最喜歡的 Perforce 用戶端;只需將 Perforce 伺服器上的
//.git-fusion目錄映射到您的工作區。檔結構如下所示:$ tree
.
├── objects
│ ├── repos
│ │ └── [...]
│ └── trees
│ └── [...]
│
├── p4gf_config
├── repos
│ └── Talkhouse
│ └── p4gf_config
└── users
└── p4gf_usermap
498 directories, 287 filesobjects fusion 在內部使用物件目錄將 perforce 物件映射到 git, 反之亦然, 您不必在其中處理任何事情。此目錄中有一個全域p4gf_config檔, 以及每個存儲庫的一個檔, 這些是決定 Git fusion 行為的設定檔。讓我們看一下根目錄中的檔:[repo-creation]
charset = utf8
[git-to-perforce]
change-owner = author
enable-git-branch-creation = yes
enable-swarm-reviews = yes
enable-git-merge-commits = yes
enable-git-submodules = yes
preflight-commit = none
ignore-author-permissions = no
read-permission-check = none
git-merge-avoidance-after-change-num = 12107
[perforce-to-git]
http-url = none
ssh-url = none
[@features]
imports = False
chunked-push = False
matrix2 = False
parallel-push = False
[authentication]
email-case-sensitivity = no
我們不會在這裡介紹這些標誌的含義, 但請注意, 這只是一個 ini 格式的文字檔, 就像 Git 用於配置一樣。此檔指定全域選項, 然後可以由特定于存儲庫的設定檔 (如
repos/Talkhouse/p4gf_config) 覆蓋全域選項。如果打開此檔, 您將看到一個[@repo]節, 其中的某些設置與全域預設值不同。您還將看到如下所示的部分:[Talkhouse-master]
git-branch-name = master
view = //depot/Talkhouse/main-dev/... ...
這是一個 Perforce 分支和 Git 分支之間的映射。只要名稱是唯一的, 就可以隨意命名該部分。
git-branch-name允許您將 git 下繁瑣的倉庫路徑轉換為更友好的名稱。view設置使用標準視圖映射語法控制如何將 perforce 檔案對應到 git 存儲庫中。可以指定多個映射, 如下例所示:[multi-project-mapping]
git-branch-name = master
view = //depot/project1/main/... project1/...
//depot/project2/mainline/... project2/...
這樣, 如果正常的工作區映射包含目錄結構中的更改, 則可以使用 Git 存儲庫複製這些更改。
我們將討論的最後一個檔是
users/p4gf_usermap, 它將 "永久使用者" 映射到 git 使用者, 您甚至可能不需要該檔。從 Perforce 變更 et 轉換為 Git 提交時, Git Fusion 的預設行為是查找 Perforce 使用者, 並使用存儲在那裡的電子郵件地址和全名, 用於 Git 中的作者提交者欄位。轉換另一種方式時, 預設值是使用存儲在 Git 提交的作者欄位中的電子郵件地址查找 Perforce 使用者, 並將變更集作為該使用者提交 (使用應用的許可權)。在大多數情況下, 此行為會做得很好, 但請考慮以下映射檔:john john@example.com "John Doe"
john johnny@appleseed.net "John Doe"
bob employeeX@example.com "Anon X. Mouse"
joe employeeY@example.com "Anon Y. Mouse"
每行的格式 <
<user> <email> "<full name>", 並創建一個使用者映射。前兩行將兩個不同的電子郵件地址映射到同一個 Perforce 使用者帳戶。如果您在多個不同的電子郵件地址 (或更改電子郵件地址) 下創建了 Git 提交, 但希望將它們映射到同一個 Perforce 使用者, 這將非常有用。從 Perforce 變更集創建 Git 提交時, 與 Perforce 使用者匹配的第一行用於 Git 作者資訊。
最後兩行遮罩了 Bob 和 Joe 的實際姓名和電子郵件地址, 這些名稱和電子郵件地址來自創建的 Git 提交。如果您想為內部專案提供開源服務, 但不想將員工目錄發佈到整個世界, 這是很好的。請注意, 電子郵件地址和全名應該是唯一的, 除非您希望所有 Git 提交都歸因於單個虛構的作者。
流程
Perforce Git 融合是 Perforce 和 Git 版本控制之間的雙向橋樑。讓我們來看看從 Git 方面工作的感覺。我們假設我們已經使用上面所示的設定檔在 "Jam" 專案中進行了映射, 我們可以這樣克隆該檔:
$ git clone https://10.0.1.254/Jam
Cloning into 'Jam'...
Username for 'https://10.0.1.254': john
Password for 'https://ben@10.0.1.254':
remote: Counting objects: 2070, done.
remote: Compressing objects: 100% (1704/1704), done.
Receiving objects: 100% (2070/2070), 1.21 MiB | 0 bytes/s, done.
remote: Total 2070 (delta 1242), reused 0 (delta 0)
Resolving deltas: 100% (1242/1242), done.
Checking connectivity... done.
$ git branch -a
* master
  remotes/origin/HEAD -> origin/master
  remotes/origin/master
  remotes/origin/rel2.1
$ git log --oneline --decorate --graph --all
* 0a38c33 (origin/rel2.1) Create Jam 2.1 release branch.
| * d254865 (HEAD, origin/master, origin/HEAD, master) Upgrade to latest metrowerks on Beos -- the Intel one.
| * bd2f54a Put in fix for jam's NT handle leak.
| * c0f29e7 Fix URL in a jam doc
| * cc644ac Radstone's lynx port.
[...]
第一次這樣做, 可能需要一些時間。正在發生的情況是, Git Fusion 正在將 Perforce 歷史記錄中所有適用的變更集轉換為 Git 提交。這種情況發生在伺服器上的本地, 所以它相對較快, 但如果你有很多歷史, 它仍然可能需要一些時間。後續提取執行增量轉換, 因此它將更像 Git 的本機速度。
正如您所看到的, 我們的存儲庫看起來與您可能使用的任何其他 Git 存儲庫完全一樣。有三個分支, Git 創建了一個跟蹤
origin/mastermaster主分支, 這對説明。讓我們做一些工作, 並創建幾個新的提交:# ...
$ git log --oneline --decorate --graph --all
* cfd46ab (HEAD, master) Add documentation for new feature
* a730d77 Whitespace
* d254865 (origin/master, origin/HEAD) Upgrade to latest metrowerks on Beos -- the Intel one.
* bd2f54a Put in fix for jam's NT handle leak.
[...]
我們有兩個新的提交。現在, 讓我們檢查是否有其他人一直在工作:
$ git fetch
remote: Counting objects: 5, done.
remote: Compressing objects: 100% (3/3), done.
remote: Total 3 (delta 2), reused 0 (delta 0)
Unpacking objects: 100% (3/3), done.
From https://10.0.1.254/Jam
   d254865..6afeb15  master     -> origin/master
$ git log --oneline --decorate --graph --all
* 6afeb15 (origin/master, origin/HEAD) Update copyright
| * cfd46ab (HEAD, master) Add documentation for new feature
| * a730d77 Whitespace
|/
* d254865 Upgrade to latest metrowerks on Beos -- the Intel one.
* bd2f54a Put in fix for jam's NT handle leak.
[...]
看起來有人是!從這個視圖中, 您不會知道它, 但
6afeb15提交實際上是使用 perforce 用戶端創建的。從 Git 的角度來看, 這只是另一個提交, 這正是重點。讓我們看看 Perforce 伺服器是如何處理合併提交的:$ git merge origin/master
Auto-merging README
Merge made by the 'recursive' strategy.
README | 2 +-
1 file changed, 1 insertion(+), 1 deletion(-)
$ git push
Counting objects: 9, done.
Delta compression using up to 8 threads.
Compressing objects: 100% (9/9), done.
Writing objects: 100% (9/9), 917 bytes | 0 bytes/s, done.
Total 9 (delta 6), reused 0 (delta 0)
remote: Perforce: 100% (3/3) Loading commit tree into memory...
remote: Perforce: 100% (5/5) Finding child commits...
remote: Perforce: Running git fast-export...
remote: Perforce: 100% (3/3) Checking commits...
remote: Processing will continue even if connection is closed.
remote: Perforce: 100% (3/3) Copying changelists...
remote: Perforce: Submitting new Git commit objects to Perforce: 4
To https://10.0.1.254/Jam
6afeb15..89cba2b master -> master
吉特認為它起作用了。讓我們從 Perforce 的角度來看待
README檔的歷史, 使用p4v的修訂圖功能: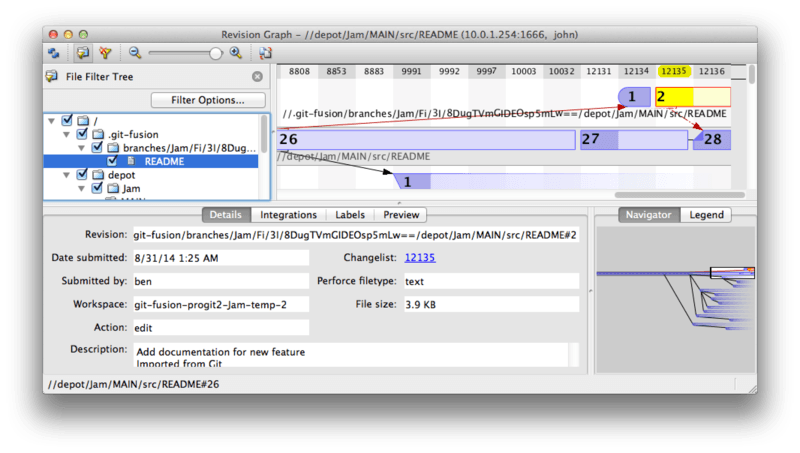
表146。執行 Git 推送產生的修訂圖。
如果你以前從來沒有見過這個視圖, 它可能看起來很混亂, 但它顯示了與 Git 歷史記錄的圖形檢視器相同的概念。我們正在查看
README檔的歷史記錄, 因此左上角的目錄樹只顯示該檔, 因為它顯示在各個分支中。在右上角, 我們有一個視覺圖, 說明文件的不同修訂是如何相關的, 這個圖形的大圖視圖在右下角。視圖的其餘部分提供給所選修訂版本的詳細資訊視圖 (在本例中為2 )。
有一點需要注意的是, 這個圖形看起來和 Git 歷史上的圖表完全一樣。Perforce 沒有一個命名分支來存儲
1和2提交, 因此它在.git-fusion目錄中做了一個 "匿名" 分支來保存它。對於與命名的 Perforce 分支不對應的命名 Git 分支, 也會發生這種情況 (以後可以使用設定檔將它們映射到 Perforce 分支)。
大多數情況發生在幕後, 但最終的結果是, 一個團隊中的一個人可以使用 Git, 另一個人可以使用 Perforce, 他們都不會知道對方的選擇。
GIT-FUSION 摘要
如果你有 (或可以獲得) 對你的 Perforce 伺服器的存取權限, Git 融合是一個偉大的方式, 使 Git 和 Perforce 相互交談。涉及到一些配置, 但學習曲線並不是很陡峭。這是本章中為數不多的幾個章節之一, 在這些章節中, 不會出現使用 Git 全部電源的警告。這並不是說 Perforce 會對你投給它的一切感到滿意--如果你試圖改寫已經被推動的歷史, Git Fusion 會拒絕它--但 Git Fusion 會非常努力地感覺到本土化。您甚至可以使用 Git 子模組 (儘管它們在 Perforce 使用者看來很奇怪) 和合併分支 (這將被記錄為 Perforce 端的集成)。
如果您無法說服伺服器的管理員設置 Git Fusion, 仍有一種方法可以將這些工具一起使用。
Git-p4
Git-p4 是 Git 和 Perforce 之間的雙向橋樑。它完全在 Git 存儲庫中運行, 因此您不需要對 Perforce 伺服器進行任何形式的訪問 (當然, 使用者憑據除外)。Git-p4 並不像 Git Fusion 那樣靈活或完整的解決方案, 但它允許您在不侵入伺服器環境的情況下完成大部分您想做的事情。
建立
例如, 我們將從 Git 融合 OVA 運行 PERFORCE 伺服器, 如上所示, 但我們將繞過 Git 融合伺服器, 直接轉到 Perforce 版本控制項。
為了使用
p4命令列用戶端 (git-p4 依賴于該用戶端), 您需要設置幾個環境變數:$ export P4PORT=10.0.1.254:1666
$ export P4USER=john開始
與 Git 中的任何內容一樣, 第一個命令是克隆:
$ git p4 clone //depot/www/live www-shallow
Importing from //depot/www/live into www-shallow
Initialized empty Git repository in /private/tmp/www-shallow/.git/
Doing initial import of //depot/www/live/ from revision #head into refs/remotes/p4/master
這就創建了 Git 術語中的 "淺" 克隆;只有最新的 Perforce 修訂版本被導入到 Git 中;請記住, Perforce 並不是為了給每個使用者提供每一個修訂。這足以將 Git 用作 Perforce 用戶端, 但對於其他目的, 這還不夠。
完成後, 我們有了一個功能齊全的 Git 存儲庫:
$ cd myproject
$ git log --oneline --all --graph --decorate
* 70eaf78 (HEAD, p4/master, p4/HEAD, master) Initial import of //depot/www/live/ from the state at revision #head
請注意 Perforce 伺服器是如何使用 "p4" 遙控器的, 但其他一切看起來都像一個標準克隆。其實, 這有點誤導人;那裡其實並沒有遙控器。
$ git remote -v
此存儲庫中根本不存在遙控器。Git-p4 創建了一些 refs 來表示伺服器的狀態, 它們看起來像
git log的遠端 refs, 但它們不是由 git 本身管理的, 您不能推送到它們。流程
好吧, 讓我們做一些工作。假設你在一個非常重要的功能上取得了一些進展, 你已經準備好向你的團隊其他成員展示它了。
$ git log --oneline --all --graph --decorate
* 018467c (HEAD, master) Change page title
* c0fb617 Update link
* 70eaf78 (p4/master, p4/HEAD) Initial import of //depot/www/live/ from the state at revision #head
我們已經進行了兩個新的提交, 我們已經準備好提交到 Perforce 伺服器。讓我們看看今天是否還有人在工作:
$ git p4 sync
git p4 sync
Performing incremental import into refs/remotes/p4/master git branch
Depot paths: //depot/www/live/
Import destination: refs/remotes/p4/master
Importing revision 12142 (100%)
$ git log --oneline --all --graph --decorate
* 75cd059 (p4/master, p4/HEAD) Update copyright
| * 018467c (HEAD, master) Change page title
| * c0fb617 Update link
|/
* 70eaf78 Initial import of //depot/www/live/ from the state at revision #head
看起來他們是,
master和p4/master已經分道揚鑣。Perforce 的分支系統與 Git的系統完全不同, 因此提交合併提交沒有任何意義。Git-p4 建議您重新建立提交的基礎, 甚至還提供了執行此操作的快捷方式:$ git p4 rebase
Performing incremental import into refs/remotes/p4/master git branch
Depot paths: //depot/www/live/
No changes to import!
Rebasing the current branch onto remotes/p4/master
First, rewinding head to replay your work on top of it...
Applying: Update link
Applying: Change page title
index.html | 2 +-
1 file changed, 1 insertion(+), 1 deletion(-)
您可能可以從輸出中分辨出來, 但
git p4 rebase是git p4 sync的快捷方式, 其次是git rebase p4/master它比這更聰明一些, 特別是在處理多個分支時, 但這是一個很好的近似值。
現在我們的歷史又是線性的, 我們準備把我們的變化貢獻給 Perforce。
git p4 submit命令將嘗試為p4/master和master之間的每個 Git 提交創建新的 perforce 修訂。運行它會讓我們進入我們最喜歡的編輯器, 檔的內容如下所示:# A Perforce Change Specification.
#
# Change: The change number. 'new' on a new changelist.
# Date: The date this specification was last modified.
# Client: The client on which the changelist was created. Read-only.
# User: The user who created the changelist.
# Status: Either 'pending' or 'submitted'. Read-only.
# Type: Either 'public' or 'restricted'. Default is 'public'.
# Description: Comments about the changelist. Required.
# Jobs: What opened jobs are to be closed by this changelist.
# You may delete jobs from this list. (New changelists only.)
# Files: What opened files from the default changelist are to be added
# to this changelist. You may delete files from this list.
# (New changelists only.)
Change: new
Client: john_bens-mbp_8487
User: john
Status: new
Description:
Update link
Files:
//depot/www/live/index.html # edit
######## git author ben@straub.cc does not match your p4 account.
######## Use option --preserve-user to modify authorship.
######## Variable git-p4.skipUserNameCheck hides this message.
######## everything below this line is just the diff #######
--- //depot/www/live/index.html 2014-08-31 18:26:05.000000000 0000
+++ /Users/ben/john_bens-mbp_8487/john_bens-mbp_8487/depot/www/live/index.html 2014-08-31 18:26:05.000000000 0000
@@ -60,7 +60,7 @@
</td>
<td valign=top>
Source and documentation for
-<a href="http://www.perforce.com/jam/jam.html">
+<a href="jam.html">
Jam/MR</a>,
a software build tool.
</td>
這主要是相同的內容, 你會看到
p4 submit除了在最後的東西, git-p4 有説明包括在內。Git-p4 試圖在必須為提交或變更集提供名稱時單獨尊重您的 Git 和 Perforce 設置, 但在某些情況下, 您希望重寫它。例如, 如果您導入的 Git 提交是由沒有 Perforce 使用者帳戶的參與者編寫的, 則您可能仍希望生成的變更集看起來像他們編寫的更改集 (而不是您)。
Git-p4 已將來自 Git 提交的消息作為此 perforce 變更集的內容導入了郵件, 因此我們要做的就是保存並退出, 每次保存兩次 (每次提交一次)。生成的 shell 輸出將如下所示:
$ git p4 submit
Perforce checkout for depot path //depot/www/live/ located at /Users/ben/john_bens-mbp_8487/john_bens-mbp_8487/depot/www/live/
Synchronizing p4 checkout...
... - file(s) up-to-date.
Applying dbac45b Update link
//depot/www/live/index.html#4 - opened for edit
Change 12143 created with 1 open file(s).
Submitting change 12143.
Locking 1 files ...
edit //depot/www/live/index.html#5
Change 12143 submitted.
Applying 905ec6a Change page title
//depot/www/live/index.html#5 - opened for edit
Change 12144 created with 1 open file(s).
Submitting change 12144.
Locking 1 files ...
edit //depot/www/live/index.html#6
Change 12144 submitted.
All commits applied!
Performing incremental import into refs/remotes/p4/master git branch
Depot paths: //depot/www/live/
Import destination: refs/remotes/p4/master
Importing revision 12144 (100%)
Rebasing the current branch onto remotes/p4/master
First, rewinding head to replay your work on top of it...
$ git log --oneline --all --graph --decorate
* 775a46f (HEAD, p4/master, p4/HEAD, master) Change page title
* 05f1ade Update link
* 75cd059 Update copyright
* 70eaf78 Initial import of //depot/www/live/ from the state at revision #head
結果就好像我們只是做了一個
git push這是最接近實際發生的事情的類比。
請注意, 在此過程中, 每個 Git 提交都將變成 "Perforce 變更集";如果你想把它們壓縮到一個單個變更集中, 你可以在運行
git p4 submit之前通過互動式重基來完成。另請注意, 作為變更集提交的所有提交的 SHA-1 雜湊值都已更改;這是因為 git-p4 在它轉換的每個提交的末尾添加了一行:$ git log -1
commit 775a46f630d8b46535fc9983cf3ebe6b9aa53145
Author: John Doe <john@example.com>
Date: Sun Aug 31 10:31:44 2014 -0800
Change page title
[git-p4: depot-paths = "//depot/www/live/": change = 12144]
如果您嘗試提交合併提交, 會發生什麼情況?讓我們來試試。以下是我們自己遇到的情況:
$ git log --oneline --all --graph --decorate
* 3be6fd8 (HEAD, master) Correct email address
*   1dcbf21 Merge remote-tracking branch 'p4/master'
|\
| * c4689fc (p4/master, p4/HEAD) Grammar fix
* | cbacd0a Table borders: yes please
* | b4959b6 Trademark
|/
* 775a46f Change page title
* 05f1ade Update link
* 75cd059 Update copyright
* 70eaf78 Initial import of //depot/www/live/ from the state at revision #head
775a46f 之後, Git 和 Perforce 的歷史出現了分歧。Git 側有兩個提交, 然後是與 Perforce 頭的合併提交, 然後是另一個提交。我們將嘗試在 Perforce 一側的一個變更集的基礎上提交這些。讓我們看看如果我們現在嘗試提交會發生什麼:
$ git p4 submit -n
Perforce checkout for depot path //depot/www/live/ located at /Users/ben/john_bens-mbp_8487/john_bens-mbp_8487/depot/www/live/
Would synchronize p4 checkout in /Users/ben/john_bens-mbp_8487/john_bens-mbp_8487/depot/www/live/
Would apply
  b4959b6 Trademark
  cbacd0a Table borders: yes please
3be6fd8 Correct email address-n標誌是--dry-run的縮寫, 它試圖報告如果提交命令是真實運行會發生什麼。在這種情況下, 我們似乎要創建三個 Perforce 變更集, 這與 Perforce 伺服器上尚不存在的三個非合併提交相對應。這聽起來正是我們想要的, 讓我們看看結果如何:$ git p4 submit
[…]
$ git log --oneline --all --graph --decorate
* dadbd89 (HEAD, p4/master, p4/HEAD, master) Correct email address
* 1b79a80 Table borders: yes please
* 0097235 Trademark
* c4689fc Grammar fix
* 775a46f Change page title
* 05f1ade Update link
* 75cd059 Update copyright
* 70eaf78 Initial import of //depot/www/live/ from the state at revision #head
我們的歷史變得線性, 就像我們在提交之前重新建立了基礎一樣 (事實上, 這正是發生的事情)。這意味著你可以自由地創建、工作、扔掉和合併 Git 一側的分支, 而不必擔心你的歷史在某種程度上與 Perforce 不相容。如果您可以重新建立它的基礎, 則可以將其貢獻給 Perforce 伺服器。
分支
如果您的 Perforce 專案有多個分支, 您並非運氣不佳;git-p4 可以用一種讓人感覺像 Git 的方式來處理。假設您的 Perforce 倉庫是這樣佈置的:
//depot
  └── project
      ├── main
      └── dev
假設您有一個開發分支, 它有一個
dev規範, 如下所示://depot/project/main/... //depot/project/dev/...
Git-p4 可以自動檢測這種情況並做正確的事情:
$ git p4 clone --detect-branches //depot/project@all
Importing from //depot/project@all into project
Initialized empty Git repository in /private/tmp/project/.git/
Importing revision 20 (50%)
    Importing new branch project/dev

    Resuming with change 20
Importing revision 22 (100%)
Updated branches: main dev
$ cd project; git log --oneline --all --graph --decorate
* eae77ae (HEAD, p4/master, p4/HEAD, master) main
| * 10d55fb (p4/project/dev) dev
| * a43cfae Populate //depot/project/main/... //depot/project/dev/....
|/
* 2b83451 Project init
請注意倉庫路徑中的 "@all" 指定符;它告訴 git-p4 不僅克隆該子樹的最新變更集, 而且克隆曾經觸及過這些路徑的所有變更集。這更接近 Git 的克隆概念, 但如果你正在做一個歷史悠久的專案, 可能需要一段時間。
--detect-branches標誌告訴 git-p4 使用 perforce 的分支規格將分支映射到 git refs。如果這些映射不存在於 Perforce 伺服器上 (這是使用 Perforce 的完全有效的方法), 則可以告訴 git-p4 分支映射是什麼, 並且得到相同的結果:$ git init project
Initialized empty Git repository in /tmp/project/.git/
$ cd project
$ git config git-p4.branchList main:dev
$ git clone --detect-branches //depot/project@all .
將
git-p4.branchList組態變數main:dev告訴 git-p4, "main" 和 "dev" 都是分支, 第二個分支是第一個分支的子級。
如果我們現在
git checkout -b dev p4/project/dev並進行一些提交, 那麼當我們進行git p4 submit時, git-p4 就足夠聰明, 可以瞄準正確的分支。不幸的是, git-p4 不能混合淺克隆和多個分支;如果您有一個龐大的專案, 並且想要在多個分支上工作, 則必須為要提交的每個分支git p4 clone。
若要創建或集成分支, 必須使用 Perforce 用戶端。Git-p4 只能同步並提交到現有分支, 並且一次只能進行一次線性更改。如果您在 Git 中合併兩個分支並嘗試提交新的變更集, 那麼將記錄的只是一組檔更改;有關集成中涉及的分支的中繼資料將丟失。
Git 和 Perforce 摘要
Git-p4 使使用 Git 工作流與 Perforce 伺服器成為可能, 而且它相當擅長它。但是, 請務必記住, Perforce 負責源, 並且您只使用 Git 在本地工作。只是在分享 Git 承諾時非常小心;如果您有其他人使用的遠端, 請不要推送任何尚未提交到 Perforce 伺服器的提交。
如果要自由地混合使用 Perforce 和 Git 作為原始程式碼管理用戶端, 並且可以誘使伺服器管理員安裝它, Git Fusion 可以使使用 Git 成為 Perforce 伺服器的一流版本控制用戶端。
Git and TFS
Git is becoming popular with Windows developers, and if you’re writing code on Windows, there’s a good chance you’re using Microsoft’s Team Foundation Server (TFS). TFS is a collaboration suite that includes defect and work-item tracking, process support for Scrum and others, code review, and version control. There’s a bit of confusion ahead: TFS is the server, which supports controlling source code using both Git and their own custom VCS, which they’ve dubbed TFVC (Team Foundation Version Control). Git support is a somewhat new feature for TFS (shipping with the 2013 version), so all of the tools that predate that refer to the version-control portion as “TFS”, even though they’re mostly working with TFVC.
If you find yourself on a team that’s using TFVC but you’d rather use Git as your version-control client, there’s a project for you.
Which Tool
In fact, there are two: git-tf and git-tfs.
Git-tfs (found at https://github.com/git-tfs/git-tfs) is a .NET project, and (as of this writing) it only runs on Windows. To work with Git repositories, it uses the .NET bindings for libgit2, a library-oriented implementation of Git which is highly performant and allows a lot of flexibility with the guts of a Git repository. Libgit2 is not a complete implementation of Git, so to cover the difference git-tfs will actually call the command-line Git client for some operations, so there are no artificial limits on what it can do with Git repositories. Its support of TFVC features is very mature, since it uses the Visual Studio assemblies for operations with servers. This does mean you’ll need access to those assemblies, which means you need to install a recent version of Visual Studio (any edition since version 2010, including Express since version 2012), or the Visual Studio SDK.
Git-tf (whose home is at https://gittf.codeplex.com) is a Java project, and as such runs on any computer with a Java runtime environment. It interfaces with Git repositories through JGit (a JVM implementation of Git), which means it has virtually no limitations in terms of Git functions. However, its support for TFVC is limited as compared to git-tfs – it does not support branches, for instance.
So each tool has pros and cons, and there are plenty of situations that favor one over the other. We’ll cover the basic usage of both of them in this book.
筆記
|
You’ll need access to a TFVC-based repository to follow along with these instructions. These aren’t as plentiful in the wild as Git or Subversion repositories, so you may need to create one of your own. Codeplex (https://www.codeplex.com) or Visual Studio Online (http://www.visualstudio.com) are both good choices for this.
|
Getting Started: git-tf
The first thing you do, just as with any Git project, is clone. Here’s what that looks like with
git-tf:$ git tf clone https://tfs.codeplex.com:443/tfs/TFS13 $/myproject/Main project_git
The first argument is the URL of a TFVC collection, the second is of the form
$/project/branch, and the third is the path to the local Git repository that is to be created (this last one is optional). Git-tf can only work with one branch at a time; if you want to make checkins on a different TFVC branch, you’ll have to make a new clone from that branch.
This creates a fully functional Git repository:
$ cd project_git
$ git log --all --oneline --decorate
512e75a (HEAD, tag: TFS_C35190, origin_tfs/tfs, master) Checkin message
This is called a shallow clone, meaning that only the latest changeset has been downloaded. TFVC isn’t designed for each client to have a full copy of the history, so git-tf defaults to only getting the latest version, which is much faster.
If you have some time, it’s probably worth it to clone the entire project history, using the
--deep option:$ git tf clone https://tfs.codeplex.com:443/tfs/TFS13 $/myproject/Main \
project_git --deep
Username: domain\user
Password:
Connecting to TFS...
Cloning $/myproject into /tmp/project_git: 100%, done.
Cloned 4 changesets. Cloned last changeset 35190 as d44b17a
$ cd project_git
$ git log --all --oneline --decorate
d44b17a (HEAD, tag: TFS_C35190, origin_tfs/tfs, master) Goodbye
126aa7b (tag: TFS_C35189)
8f77431 (tag: TFS_C35178) FIRST
0745a25 (tag: TFS_C35177) Created team project folder $/tfvctest via the \
Team Project Creation Wizard
請注意名稱為
TFS_C35189的標記;這是一個功能, 可以説明您知道哪些 Git 提交與 TFVC 變更集相關聯。這是一種很好的表示它的方法, 因為您可以通過一個簡單的日誌命令來查看您的提交與也存在於 TFVC 中的快照相關聯的快照。它們不是必需的 (事實上, 您可以使用git config git-tf.tag falsetf. tag false 將它們關閉) –git-t糟器在.git/git-tf檔中保留了真正的提交更改集映射。
入門: git-tfs
Git-tfs 克隆的行為有點不同。觀察:
PS> git tfs clone --with-branches \
    https://username.visualstudio.com/DefaultCollection \
    $/project/Trunk project_git
Initialized empty Git repository in C:/Users/ben/project_git/.git/
C15 = b75da1aba1ffb359d00e85c52acb261e4586b0c9
C16 = c403405f4989d73a2c3c119e79021cb2104ce44a
Tfs branches found:
- $/tfvc-test/featureA
The name of the local branch will be : featureA
C17 = d202b53f67bde32171d5078968c644e562f1c439
C18 = 44cd729d8df868a8be20438fdeeefb961958b674
請注意
--with-branches標誌。Git-tfs 能夠將 TFVC 分支映射到 Git 分支, 此標誌告訴它為每個 TFVC 分支建立一個本地 Git 分支。如果您曾經在 TFS 中分支或合併過, 但它不適用於早于 TFS 2010 的伺服器, 則強烈建議使用該版本之前, "分支" 只是資料夾, 因此 git-tfs 無法從常規資料夾中判斷它們。
讓我們看一下生成的 Git 存儲庫:
PS> git log --oneline --graph --decorate --all
* 44cd729 (tfs/featureA, featureA) Goodbye
* d202b53 Branched from $/tfvc-test/Trunk
* c403405 (HEAD, tfs/default, master) Hello
* b75da1a New project
PS> git log -1
commit c403405f4989d73a2c3c119e79021cb2104ce44a
Author: Ben Straub <ben@straub.cc>
Date:   Fri Aug 1 03:41:59 2014 +0000

    Hello

    git-tfs-id: [https://username.visualstudio.com/DefaultCollection]$/myproject/Trunk;C16
有兩個局部分支,
master分支featureA, 它們表示克隆 (Tfvc 中Trunk ) 的初始起點, 以及一個子分支 (tfvc 中featureA 。您還可以看到tfs "遠端" 也有幾個參考:defaultfeatureA, 它們代表 tfvc 分支。Git-tfs 將克隆到tfs/default, 其他人將獲得自己的名稱。
另一件要注意的事情是
git-tfs-id:提交消息中的行。Git-tfs 使用這些標記而不是標記將 TFVC 變更集與 Git 提交相關聯。這意味著您的 Git 提交將有一個不同的 SHA-1 雜湊之前和之後, 他們已被推送到 TFVC。Git-tf 工作流程
手寫
|
無論使用哪種工具, 都應設置幾個 Git 配置值, 以避免遇到問題。
|
接下來你要做的顯然是在這個專案上工作。TFVC 和 TFS 具有幾個功能, 可能會增加工作流的複雜性:
- TFVC 中未表示的要素分支增加了一定的複雜性。這與 TFVC 和 git 表示分支的方式非常不同有關。
- 請注意, TFVC 允許使用者從伺服器 "簽出" 檔, 鎖定這些檔, 以便其他人無法編輯這些檔。這顯然不會阻止您在本機存放區庫中編輯它們, 但在將更改推送到 TFVC 伺服器時, 它可能會妨礙您的更改。
- TFS 具有 "門控" 簽入的概念, 其中 TFS 構建測試週期必須在允許簽入之前成功完成。這使用了 TFVC 中的 "擱置" 函數, 我們在這裡不詳細介紹該函數。你可以假裝在手動的方式與強吧, 和強 tfs 提供的
checkintool命令, 這是門感知。
為了簡潔起見, 我們將在這裡介紹的是快樂之路, 它回避或避免了其中的大多數問題。
工作流程: git-tf
假設您已經完成了一些工作, 在
master上進行了一些 git 提交, 並且您已準備好在 TFVC 伺服器上共用您的進度。以下是我們的 Git 存儲庫:$ git log --oneline --graph --decorate --all
* 4178a82 (HEAD, master) update code
* 9df2ae3 update readme
* d44b17a (tag: TFS_C35190, origin_tfs/tfs) Goodbye
* 126aa7b (tag: TFS_C35189)
* 8f77431 (tag: TFS_C35178) FIRST
* 0745a25 (tag: TFS_C35177) Created team project folder $/tfvctest via the \
Team Project Creation Wizard
我們要拍攝
4178a82的快照, 並將其推送到 TFVC 伺服器。首先要做的是: 讓我們看看自上次連接以來, 我們的隊友是否做了什麼:$ git tf fetch
Username: domain\user
Password:
Connecting to TFS...
Fetching $/myproject at latest changeset: 100%, done.
Downloaded changeset 35320 as commit 8ef06a8. Updated FETCH_HEAD.
$ git log --oneline --graph --decorate --all
* 8ef06a8 (tag: TFS_C35320, origin_tfs/tfs) just some text
| * 4178a82 (HEAD, master) update code
| * 9df2ae3 update readme
|/
* d44b17a (tag: TFS_C35190) Goodbye
* 126aa7b (tag: TFS_C35189)
* 8f77431 (tag: TFS_C35178) FIRST
* 0745a25 (tag: TFS_C35177) Created team project folder $/tfvctest via the \
Team Project Creation Wizard
Looks like someone else is working, too, and now we have divergent history. This is where Git shines, but we have two choices of how to proceed:
- Making a merge commit feels natural as a Git user (after all, that’s what
git pulldoes), and git-tf can do this for you with a simplegit tf pull. Be aware, however, that TFVC doesn’t think this way, and if you push merge commits your history will start to look different on both sides, which can be confusing. However, if you plan on submitting all of your changes as one changeset, this is probably the easiest choice. - Rebasing makes our commit history linear, which means we have the option of converting each of our Git commits into a TFVC changeset. Since this leaves the most options open, we recommend you do it this way; git-tf even makes it easy for you with
git tf pull --rebase.
The choice is yours. For this example, we’ll be rebasing:
$ git rebase FETCH_HEAD
First, rewinding head to replay your work on top of it...
Applying: update readme
Applying: update code
$ git log --oneline --graph --decorate --all
* 5a0e25e (HEAD, master) update code
* 6eb3eb5 update readme
* 8ef06a8 (tag: TFS_C35320, origin_tfs/tfs) just some text
* d44b17a (tag: TFS_C35190) Goodbye
* 126aa7b (tag: TFS_C35189)
* 8f77431 (tag: TFS_C35178) FIRST
* 0745a25 (tag: TFS_C35177) Created team project folder $/tfvctest via the \
          Team Project Creation Wizard
Now we’re ready to make a checkin to the TFVC server. Git-tf gives you the choice of making a single changeset that represents all the changes since the last one (
--shallow, which is the default) and creating a new changeset for each Git commit (--deep). For this example, we’ll just create one changeset:$ git tf checkin -m 'Updating readme and code'
Username: domain\user
Password:
Connecting to TFS...
Checking in to $/myproject: 100%, done.
Checked commit 5a0e25e in as changeset 35348
$ git log --oneline --graph --decorate --all
* 5a0e25e (HEAD, tag: TFS_C35348, origin_tfs/tfs, master) update code
* 6eb3eb5 update readme
* 8ef06a8 (tag: TFS_C35320) just some text
* d44b17a (tag: TFS_C35190) Goodbye
* 126aa7b (tag: TFS_C35189)
* 8f77431 (tag: TFS_C35178) FIRST
* 0745a25 (tag: TFS_C35177) Created team project folder $/tfvctest via the \
Team Project Creation Wizard
有一個新的
TFS_C35348標記, 表示 TFVC 存儲的快照與5a0e25e提交完全相同。需要注意的是, 並不是每個 Git 承諾都需要在 TFVC 中有一個精確的對應項;例如, 6eb3eb5提交在伺服器上的任何地方都不存在。
這是主要的工作流程。您還需要記住以下幾個其他注意事項:
- 沒有分支。Git-tf 一次只能從一個 TFVC 分支創建 Git 存儲庫。
- 使用 TFVC 或 Git 進行協作, 但不能兩者兼而有之。同一 TFVC 存儲庫中的不同 git-tf 克隆可能具有不同的提交 SHA-1 雜湊, 這不會導致頭痛的結束。
- 如果您的團隊的工作流程包括在 Git 中進行協作並定期與 TFVC 同步, 則只能使用其中一個 Git 存儲庫連接到 TFVC。
工作流程: git-tfs
讓我們使用 git-tfs 遍歷相同的場景。以下是我們對 Git 存儲庫中的
master分支所做的新提交:PS> git log --oneline --graph --all --decorate
* c3bd3ae (HEAD, master) update code
* d85e5a2 update readme
| * 44cd729 (tfs/featureA, featureA) Goodbye
| * d202b53 Branched from $/tfvc-test/Trunk
|/
* c403405 (tfs/default) Hello
* b75da1a New project
現在讓我們看看是否還有人在我們駭客攻擊的時候做了工作:
PS> git tfs fetch
C19 = aea74a0313de0a391940c999e51c5c15c381d91d
PS> git log --all --oneline --graph --decorate
* aea74a0 (tfs/default) update documentation
| * c3bd3ae (HEAD, master) update code
| * d85e5a2 update readme
|/
| * 44cd729 (tfs/featureA, featureA) Goodbye
| * d202b53 Branched from $/tfvc-test/Trunk
|/
* c403405 Hello
* b75da1a New project
是的, 原來我們的同事添加了一個新的 TFVC 變更集, 它顯示為新
aea74a0提交, 並且tfs/default遠端分支已移動。
與 git-tf 一樣, 我們有兩個關於如何解決這一不同歷史的基本選擇:
- 重建以保留線性歷史記錄。
- 合併以保留實際發生的情況。
在這種情況下, 我們將執行 "深度" 簽入, 其中每個 Git 提交都將成為 TFVC 變更集, 因此我們要重新建立基礎。
PS> git rebase tfs/default
First, rewinding head to replay your work on top of it...
Applying: update readme
Applying: update code
PS> git log --all --oneline --graph --decorate
* 10a75ac (HEAD, master) update code
* 5cec4ab update readme
* aea74a0 (tfs/default) update documentation
| * 44cd729 (tfs/featureA, featureA) Goodbye
| * d202b53 Branched from $/tfvc-test/Trunk
|/
* c403405 Hello
* b75da1a New project
現在, 我們已準備好通過將代碼簽入 TFVC 伺服器來完成我們的貢獻。我們將使用
rcheckinin 命令為從 head 到找到的第一個tfs遠端分支的路徑中的每個 git 提交創建 tfvc 變更集 (checkin命令只會創建一個變更集, 類似于壓縮 git 提交)。PS> git tfs rcheckin
Working with tfs remote: default
Fetching changes from TFS to minimize possibility of late conflict...
Starting checkin of 5cec4ab4 'update readme'
add README.md
C20 = 71a5ddce274c19f8fdc322b4f165d93d89121017
Done with 5cec4ab4b213c354341f66c80cd650ab98dcf1ed, rebasing tail onto new TFS-commit...
Rebase done successfully.
Starting checkin of b1bf0f99 'update code'
edit .git\tfs\default\workspace\ConsoleApplication1/ConsoleApplication1/Program.cs
C21 = ff04e7c35dfbe6a8f94e782bf5e0031cee8d103b
Done with b1bf0f9977b2d48bad611ed4a03d3738df05ea5d, rebasing tail onto new TFS-commit...
Rebase done successfully.
No more to rcheckin.
PS> git log --all --oneline --graph --decorate
* ff04e7c (HEAD, tfs/default, master) update code
* 71a5ddc update readme
* aea74a0 update documentation
| * 44cd729 (tfs/featureA, featureA) Goodbye
| * d202b53 Branched from $/tfvc-test/Trunk
|/
* c403405 Hello
* b75da1a New project
請注意, 每次成功簽入 TFVC 伺服器後, git-tfs 都將剩餘的工作重新建立在它剛剛執行的操作的基礎上。這是因為它將
git-tfs-id欄位添加到提交消息的底部, 從而更改 SHA-1 雜湊。這完全是設計的, 沒有什麼可擔心的, 但你應該意識到它正在發生, 特別是當你與他人共用 Git 提交。
TFS 具有與其版本控制系統集成的許多功能, 如工作項、指定檢閱者、門控簽入等。僅使用命令列工具使用這些功能可能會很麻煩, 但幸運的是, git-tfs 可以讓您很容易地啟動圖形簽入工具:
PS> git tfs checkintool
PS> git tfs ct
它看起來有點像這樣:
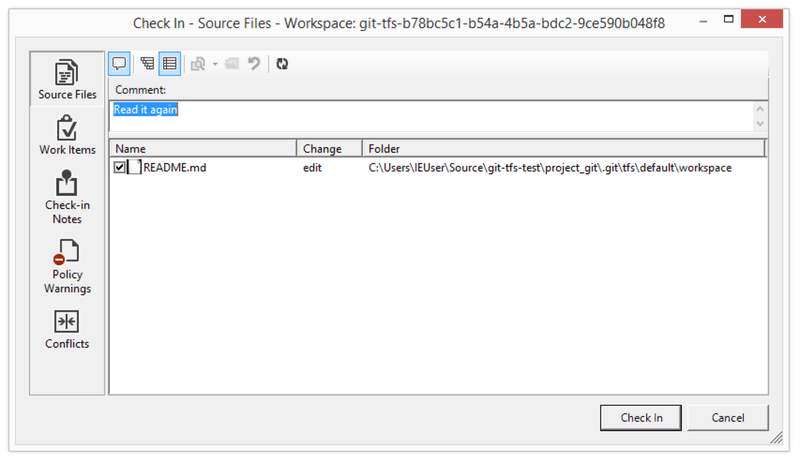
第147分。Git-tfs 簽入工具。
這將看起來熟悉 TFS 使用者, 因為它是從 Visual Studio 中啟動的相同對話方塊。
Git-tfs 還允許您從 Git 存儲庫中控制 TFVC 分支。例如, 讓我們創建一個:
PS> git tfs branch $/tfvc-test/featureBee
The name of the local branch will be : featureBee
C26 = 1d54865c397608c004a2cadce7296f5edc22a7e5
PS> git log --oneline --graph --decorate --all
* 1d54865 (tfs/featureBee) Creation branch $/myproject/featureBee
* ff04e7c (HEAD, tfs/default, master) update code
* 71a5ddc update readme
* aea74a0 update documentation
| * 44cd729 (tfs/featureA, featureA) Goodbye
| * d202b53 Branched from $/tfvc-test/Trunk
|/
* c403405 Hello
* b75da1a New project
在 TFVC 中創建分支意味著在該分支現在存在的位置添加一個變更集, 並將其投影為 Git 提交。還請注意, git-tfs創建了
tfs/featureBeebee 遠端分支, 但HEAD仍指向master。如果要在新創建的分支上工作, 您需要將新提交1d54865提交的基礎上, 也許可以從該提交創建一個主題分支。Git 和 TFS 摘要
Git-tf 和 Git-tfs 都是與 TFC 伺服器介面的好工具。它們允許您在本地使用 Git 的強大功能, 避免不斷往返于中央 TFVC 伺服器, 並使您作為開發人員的生活變得更加輕鬆, 而無需強制您的整個團隊遷移到 Git。如果您在 Windows 上工作 (如果您的團隊使用的是 TFS, 則可能需要使用 git-tfs, 因為它的功能集更完整, 但如果您在另一個平臺上工作, 則會使用 git-tf, 這將是更有限的。與本章中的大多數工具一樣, 您應該選擇這些版本控制系統中的一個是規範的, 並以從屬的方式使用另一個版本控制系統--Git 或 TFVC 應該是協作的中心, 但不是兩者兼而有之。


沒有留言:
張貼留言